Introduction
To access the aTouchAway® Dashboards, use Google Chrome and go to http://dashboards.aetonix.com/. Please log in with the same credentials that you registered with in the app.
If you are using a TEST organization, you must log in with the credentials of the TEST organization.
This article also discusses:
- Requesting a Kit for aTouchAway / Simplified Patients via the Patients page
- Adding a Patient Manager Directly to a Patient
- Viewing Health Results
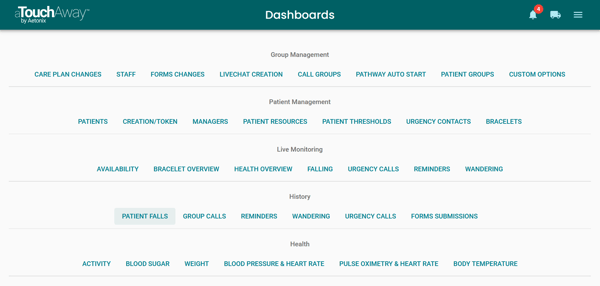
Creation / Token Page
To access the Creation / Token page, on the Dashboards under Patient Management, click Creation / Token.

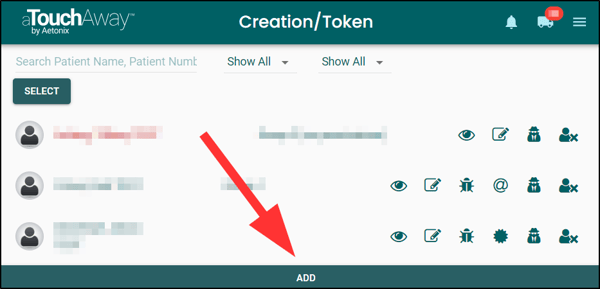
Add a Patient
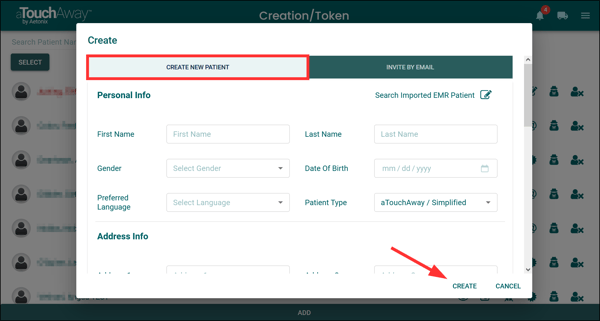
Assign a Patient Type
As you are creating a new patient, select the Patient Type from the dropdown menu in the Personal Info section. Choose aTouchAway / Simplified for a patient using an aTouchAway® solution kit.

Add a Patient to a Patient Group
If you are creating a new patient account, you can add the patient to one or more Patient Groups in the Health Info section of the Create window.

Add a Pinned Note
If you want to add non-clinical details to the patient's record at the time the patient is created, add text to the Pinned Note text box.

Click Create to add the patient.
Edit a Patient Account
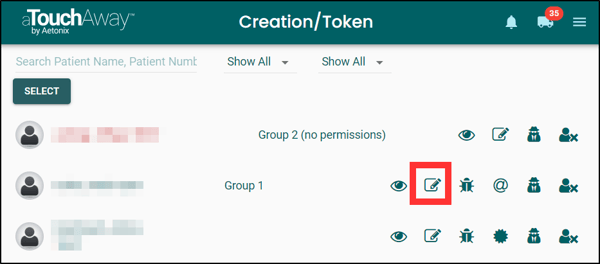
To edit a patient account, find the patient's name on the Creation / Token page. Search for the patient's name using their patient number or health card number. Click the Edit icon to the right of their name.

On the Edit Patient Info window, update information as needed. Click Save to update the patient's account.

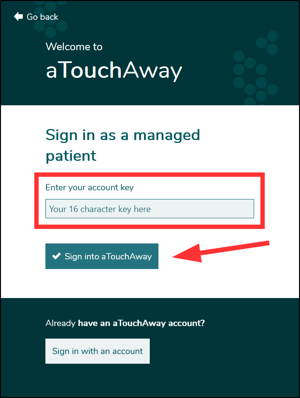
Access a Patient Token (Account Key)
The patient will now be listed on the Creation / Token page.
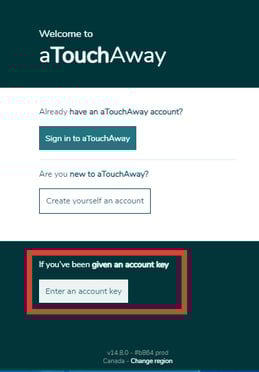
To obtain the patient's Token (Account Key), click on the token icon as seen below. A pop-up window will display an alphanumeric code.

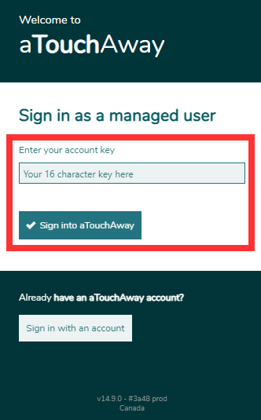
On the patient's tablet, click Enter an account key.
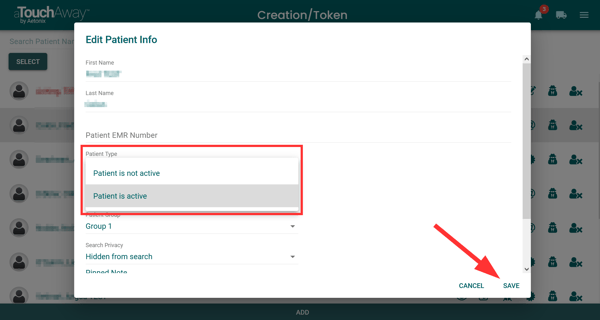
Make a Patient Inactive
Locate the patient to deactivate. Click the Edit icon to the right of their name.
Click the box under Patient Active State. Select Patient is not active from the dropdown list. Click Save to update the patient's account.

If you would like to maintain the data in the patient’s account for historical/reporting purposes, do not remove managers. The account will still be inactive, but the manager(s) will be able to access the patient's data from the aTouchAway® App. If you remove the managers, staff members who have the ability to log in to Dashboards will be able to re-activate the patient and re-assign themselves as a Patient Manager to view the account at any time.
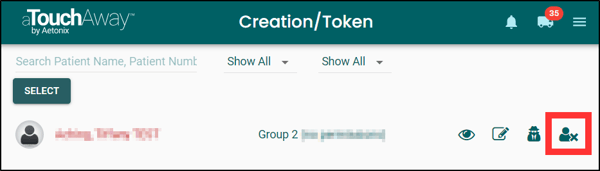
The names of Inactive patients will be red on the Creation / Token page and will only have the icons applicable to inactive patients to the right of their names.

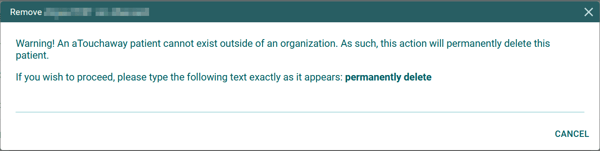
Remove a Patient Account
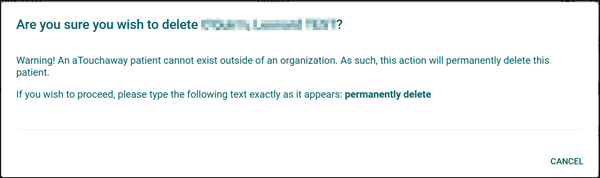
Please note that after clicking OK, the data will be deleted permanently.

Patients Page
To access the Patients page, on the Dashboards under Patient Management, click Patients.

Add a New Patient
Add a new patient by clicking the + Add Patient button in the top right corner of the page.

Enter the patient's information in the Create New Patient window.

Assign a Patient Type
As you are creating a new patient, select the Patient Type from the dropdown menu in the Personal Info section. Choose aTouchAway / Simplified for a patient using an aTouchAway® solution kit.

Assign a Patient to a Patient Group
Add the patient to one or more Patient Groups by clicking the dropdown list in the Health Info section of the Create New Patient window. Click the checkbox to the left of one or more Patient Group names to add the patient to the Patient Group(s).

Add a Pinned Note
If you want to add non-clinical details to the patient's record at the time the patient is created, add text to the Pinned Note text box.

Click Create New Patient at the bottom of the form.
Edit a Patient Account
To edit a patient's account, on the Patients page, click the 3 dots to the right of the patient's name. On the 3-dot menu, click Edit.

Access a Patient Token (Account Key)
To obtain the patient's Token (Account Key), on the Patients page, click the 3 dots to the right of the patient's name. On the 3-dot menu, click Patient Token. A pop-up window will display an alphanumeric code.

On the patient's tablet, click Enter an account key.
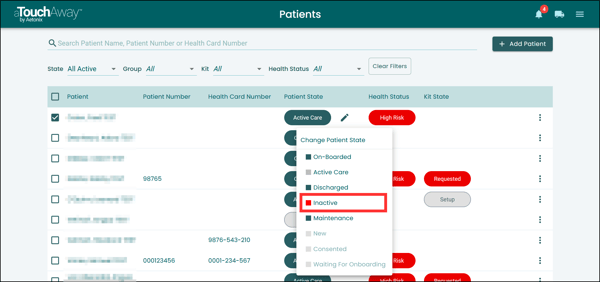
Make a Patient Inactive
Locate the patient to deactivate. Click the checkbox to the left of their name to enable state changing.

Click the pencil to the right of the Patient State pill.

In the Inactive Warning pop-up window, check the boxes next to Remove Managers, Remove Contacts (recommended), and Stop Pathways. Clicking Remove Managers automatically checks Stop Pathways. Click Deactivate.

If you would like to maintain the data in the patient’s account for historical/reporting purposes, do not remove managers. The account will still be inactive, but the manager(s) will be able to access the patient's data from the aTouchAway® App. If you remove the managers, staff members who have the ability to log in to Dashboards will be able to re-activate the patient and re-assign themselves as a Patient Manager to view the account at any time.
Click the checkbox to the left of their name to disable state changing.
The names of inactive patients will not appear by default on the Patients page. To find an Inactive patient, on the Patients page, click the State filter dropdown list.

Click the checkbox next to Inactive to include Inactive patients in the list.

Remove a patient account
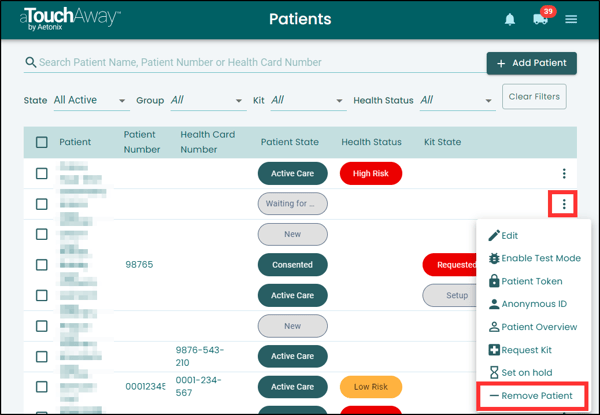
Please note that after clicking OK, the data will be deleted permanently.

Request a Leased Kit
For those patients who will use a leased aTouchAway® solution kit for their Care Plan, requesting a kit is done through the aTouchAway® solution.
To request a kit, on the Patients page, click the 3 dots to the right of the patient's name. On the 3-dot menu, click Request Kit.

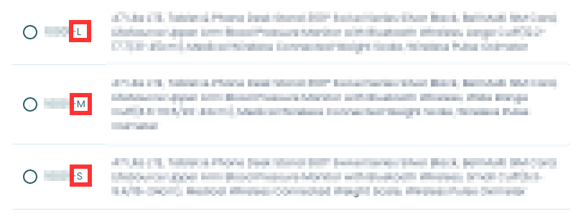
On the Request Kit window, choose the appropriate kit from the list. Each kit has a description that includes a list of the included devices. The description also includes sizing for the blood pressure cuff, if applicable.
The L, M, S at the end of the kit style number refer to Large, Medium and Small blood pressure cuff sizes.
Large cuff size: 12.2"-17.7" / 31-45 cm
Medium cuff size (wide range cuff size): 8.6"-16.5" / 22-42 cm
Small cuff size: 6.3"-9.4" / 16-24 cm
Complete filling out the form on the Request Kit window. Add any additional notes as needed to the bottom of the form. Click Submit.
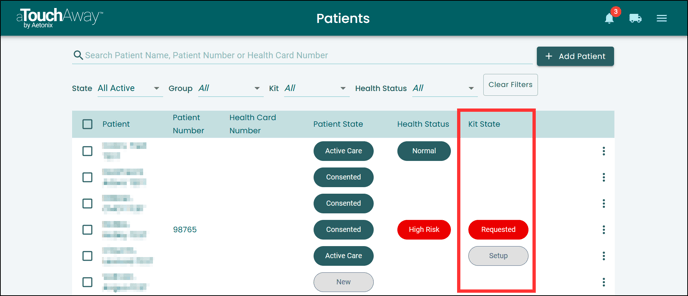
You will be able to check the state of the requested kit on the Patients page under Kit State.
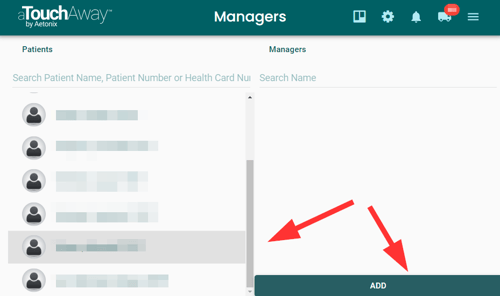
Add a Patient Manager directly to a Patient

Select the patient to whom you want to assign manager(s) and click ADD at the bottom of the screen.
In the pop-up window, enter the email of the staff member who will be assigned as the Patient Manager. Click the staff member's name when it appears below the search field.
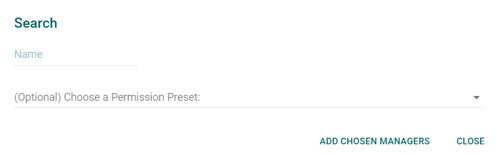
Select the Manager(s) and choose the permission preset you would like them to have (optional). If you do not select a preset, they will be assigned the default permissions.
To learn about how to set permissions and create presets, see How to set Manager Permissions.
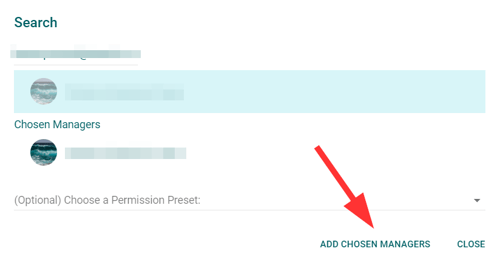
After selecting the Manager(s) you would like to assign, click Add Chosen Managers.
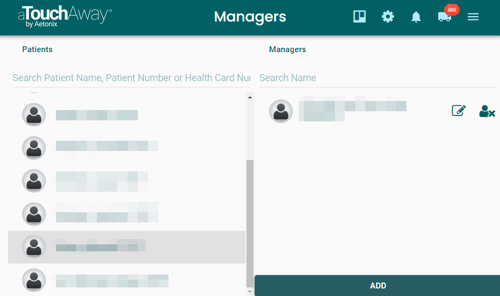
The manager(s) will now appear in the Managers column for the chosen patient.
This process can be repeated for each patient and for each manager that you want to assign. If you have many patients managed by the same manager, you will prefer to use the next method, assigning Managers to more than one patient at a time.
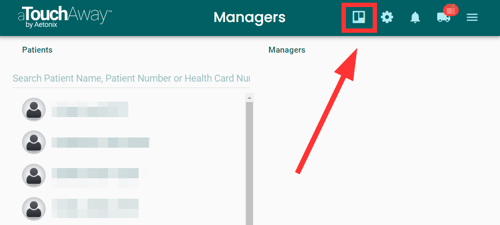
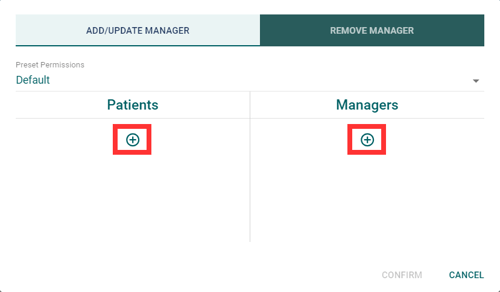
Assign a Patient Manager to more than one patient at a time
On the Dashboards under Patient Management, select Managers.

Select the Bulk Edit tool in the top bar, next to the gear icon.
Select the patients to which you are assigning managers by clicking the + under Patients.
Then, select the Managers you are assigning to these patients by clicking the + under Managers.
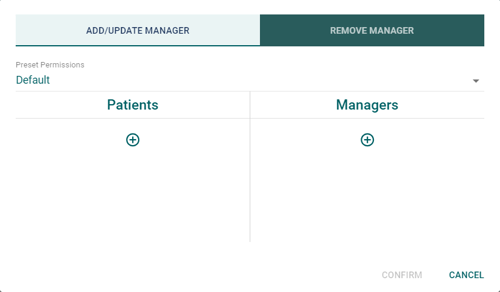
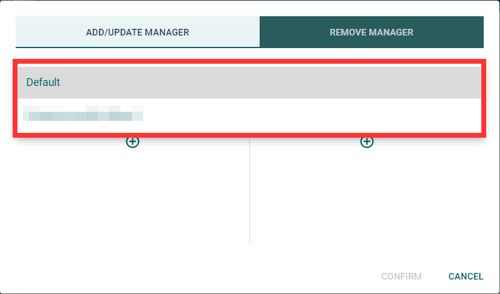
Select the permissions you would like to assign to these managers for these patients from the permissions drop-down menu near the top of the box.

Click Confirm to accept the changes you've made.
If your managers require different permission sets, you will need to add them separately to groups of patients.
Removing a Direct Patient Manager
To remove a Direct Patient Manager, on the Managers page, select the patient's name. Find the name of the Patient Manager that is to be deleted. Click the X icon to the right of the Patient Manager's name.
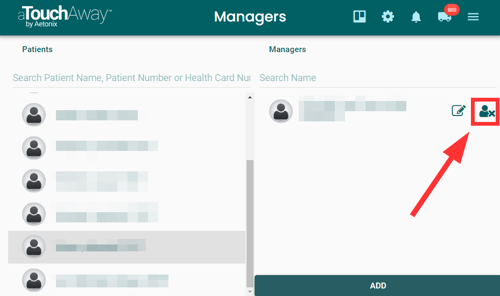
A confirmation window will open. Click OK to remove the selected manager or click Cancel to return to the Manager page.

Creating and Using Permission Presets
If you have many managers and many patients, setting individual permissions can be very time-consuming. Use the bulk editing tools to make permissions setting easier.
From the Dashboards, under Patient Management, click Managers. Then, in the top right corner of this screen, click the gear icon to open the Default Permissions and Preset Permissions screen.
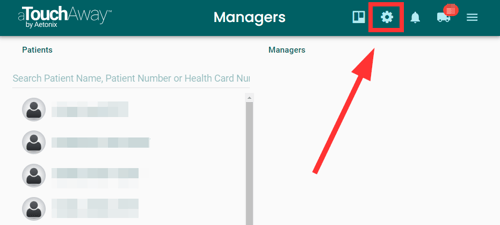
At the top, you will see Default Permissions and Presets Permissions tabs.
Select all the permissions that you want as a base or default for your managers, or create a preset of select permissions that you want to use for a select set of managers. Once you've set the permissions, click Save.

Now that your default or preset permissions are configured, you can apply them in bulk through the following actions:
Select the bulk edit tool, at the top right of the Managers page in the Dashboards.

This tool can be used to add or update managers for patients, using the default or preset permissions. Add your available patients by clicking the + button under Patients. Then add your managers to the Managers list.
You can then assign the permissions by selecting either the default permissions that you've set or any of the presets that you've created.
Once you have your patients, your managers, and your permissions selected, click Confirm to set the managers and permissions for the patients.