Table of Contents:
2. aTouchAway® Dashboards Home Page
3. aTouchAway® Dashboards Dropdown Menu
1. Log in
To log in to the Aetonix® Dashboards, go to https://dashboards.aetonix.com/. Use your Aetonix® account information to access the Dashboards according to your role in your organization.
.png?width=500&name=new_dashboards_login_screen%20(1).png)
Enter the email address associated with your Aetonix account and your password, then click Login.
2. aTouchAway® Dashboards Home Page

Your Dashboards may vary from the one pictured, depending on the permissions that are set on your account. Click any link to access the page.
3. aTouchAway® Dashboards Dropdown Menu
This is the quick-access 3 stripes icon on the top-right of the Aetonix® Dashboards. When opened, it allows you to quickly access different functionalities of the Dashboards under different categories, such as Patient Management, History, and Health.

You will find information related to your organization, group, the version of the Dashboards, and the region. You can also Logout to end the current session and return to the login page.
4. Group Management
4.1 Care Plan Changes
This page allows you to consult a patient's care plan. To filter the patients, search by patient number or health card number. To cancel the filter, clear all characters from the search.

4.2 Staff
This page allows you to view the members of your workgroup and add a new member if desired. A future member needs an aTouchAway® account before they can be added to the group. You can also add a filter to the list to easily find a group member.
To filter the members by name, click Search Name and enter the name of the identified member. To cancel the filter, clear all characters from the search.

To remove a member from the group, click the Delete icon.

To add a group member, click Add at the bottom of the screen, and enter the required information. Click Done to return to the list.

To bulk edit, click the Edit button and select staff members by checking the box to the left of their names. After staff members have been checked, you can bulk verify users or change Patient Groups.

4.3 Forms Changes
This page allows you to see the changes a patient has made in any existing group forms as well as the date and time the changes were made.

4.4 Call Groups
You can create a Call Group for your patients to call a group of designated Care Team members, depending on your use case. The patients will be able to call the group if they need assistance. All members will be notified, and whoever answers the call first joins the patient's call and can provide assistance. Depending on each member's availability settings in aTouchAway®, they will receive the call notification only when they are online.

To delete a member from the Call Group, click the Delete icon next to their name.
4.5 Pathway Auto Start
Depending on your use case, you may need to start a pathway automatically for all patients that join your group for the first time as when, for example, they register using the Registration link you provided to your group. This pathway is set to start for the group right away with the designated care plan that you configured with the Aetonix® team.
- Go to Pathway Auto Start.
- Select the pathway from the dropdown menu. This menu will show you any available pathway for your organization depending on your configuration.
- Add an ACTOR. This is the contact person who will receive any notifications/prompts to follow up with the patients as they move through the automatic pathway. There can be as many actors as you need depending on your use case.
- Click Save.

To delete an actor from the pathway, click the Delete icon next to their name and click Save to save the changes.
4.6 Patient Groups
This feature allows the creation of a group with assigned managers that will have predetermined access to a set group of patients.
- Create a Patient Group:
a. Go to Patient Groups.
b. Click on Create a Patient Group.
c. Name the group and enter a description (optional). - Go to the permissions settings (gear icon) and select permissions for the managers you will add. All permissions can be added (if required) by clicking on Set All Permissions. Click Submit.
- Click on the Patient Group name to highlight it. Click on Add a Manager at the bottom of the page. Search for a manager's name and click on their name to add them. Continue adding as many managers as wanted and click Close when done.

Your group will be set, so all you need to do now is add patients to that group, so managers have access to their profiles. The next section shows how to create patients and work with existing patients.
Organization Managers have the ability to lock and unlock Patient Groups.
When a Patient Group is locked, Organization Managers are still able to delete a Patient Group.
Any staff member who is not logged in as an Organization Manager will not be able to change:
- the lock / unlock setting
- group permissions for locked groups
- patients in a locked group
- managers for a locked group
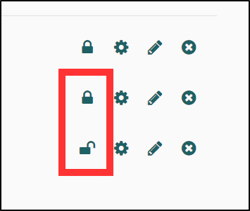
The Patient Groups page will display an icon to show if the Patient Group is currently locked or unlocked.

Organization Managers
If the user is logged in as an Organization Manager, they are able to lock or unlock the Patient Group by clicking the appropriate icon. The icons toggle between locked and unlocked.
After clicking the icon, a confirmation window will appear for both locking and unlocking a Patient Group. Click OK to confirm the action or Cancel to stop the process.


An Organization Manager is able to set the permissions for the group using the cog icon.
If the Patient Group is locked, only an Organization Manager can change the permission settings.

The Organization Manager is able to add Patient Group Managers by clicking Add A Manager at the bottom of the window or remove them by clicking the X icon to the right of the appropriate name.
If the Patient Group is locked, only an Organization Manager can change the Managers for the Patient Group.

Staff (those who do not have Organization Manager logins)
On the Patient Groups page, staff see a locked / unlocked icon next to each Patient Group.

If a Patient Group is locked, staff will not be able to add or remove a Manager as no icon or button will appear when the Patient Group name is selected.

If a Staff member tries to toggle a lock / unlock icon, a warning will pop up reminding them that only Organization Managers are able to change this setting.

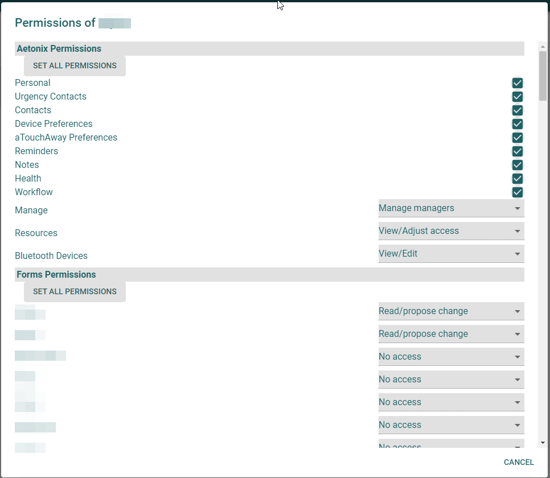
If a Patient Group is locked, Staff will not be able to change the Patient Group Permissions. All checkboxes and dropdown lists will be grey and unalterable.
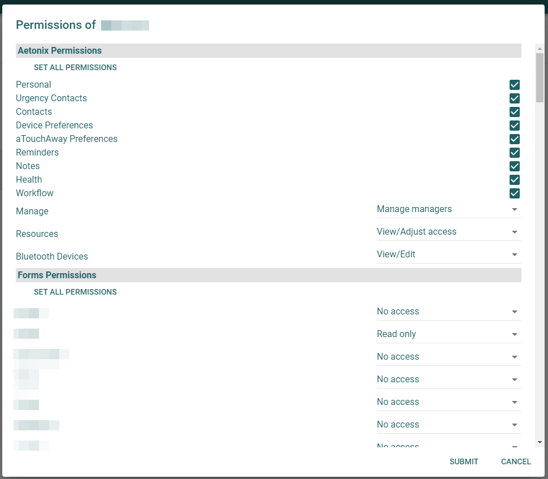
If a Patient Group is unlocked, Staff will be able to change permissions as needed.
5. Patient Management
Depending upon the implementation of your account, you will use one of two ways to add, remove, and edit patients. You will use one of these pages:
- Creation / Token (see section 5.1a)
- Patients (see section 5.1b)
5.1a Creation/Token
This page allows you to view and edit existing patients as well as add new patients.

| A | Select button: allows the user to bulk select patients |
| B | Search field: search by name, patient number, or health card number |
| C | Status filter: filter patients by status (ex. New, Consent, Ready, Inactive) |
| D | Patient Group filter: filter patients by Patient Group membership |
| E | View: quick access to Patient Health Overview |
| F | Test Mode: enable / disable test mode |
| G | Anonymous ID: access to anonymous identifier for the patient |
| H | List of patients who have been added to the system |
| I | List of Patient Group(s) that patients belong to |
| J | Edit: access to edit patient information |
| K | Token: tokens are unique identifiers that are used to connect to accounts |
| L | Remove from organization: the patient will be removed from the organization (Mobile / Bring Your Own Device patients) or deleted from the aTouchAway® solution (aTouchAway / Simplified patients) |
| M | Add: add new patients; can complete new patient form or invite patients by email |
The Select button makes it possible to bulk select patients from the list. After clicking on the Select button, select the patients by checking the box to the left of their names. Those patients that are checked can then be moved to new Patient Group(s) or removed from all Patient Groups. Test mode can also be enabled or disabled for checked patients.

Adding a New Patient
Add a new patient by clicking on the Add button at the bottom of the page.

Enter the patient's information on the Create New Patient tab. Click Create when you are finished.

Assigning Patient Type
As you are creating a new patient, or by editing a current patient, select the patient type from the dropdown menu in the Personal Info section of the Create window (Create New Patient tab) or in the Edit Patient Info window.


Adding Patients to a Patient Group
If you are creating a new patient, or editing a current patient, you can add the patient to one or more Patient Groups in the Health Info section of the Create window (Create New Patient tab) or the Edit Patient Info window.


Inviting a Patient by Email
To create a patient that will use the aTouchAway® App on their own device, you will want to invite them by email. For this, use the Invite by Email tab of the Create window.

Enter the patient's email address. You can add this patient to an existing Patient Group or add a new manager that will have all permissions by default.
An email will be sent to the patient, and it will be marked as "Pending Outgoing Invitation" until they click on the link in the email and activate their account.
5.1b Patients
Users with access to the Patients link on their Dashboards will use it to create, edit, and remove patients. Patients can also be filtered by State, Patient Group, Kit state, and Health Status. This page includes access to order aTouchAway® kits.

| A | Search field: search by name, patient number, or health card number |
| B | + Add Patient: add new patients; can also search for existing patients to update info |
| C | State filter: filter patients by status (ex. New, Consent, Ready, Inactive) |
| D | Patient Group filter: filter patients by Patient Group membership |
| E | Kit filter: filter patients by kit status (ex. Requested, Assigned, Returned) |
| F | Health Status filter: filter by health status (normal, low risk, high risk) |
| G | List of patients who have been added to the system and check boxes for bulk functions (Change Patient Group(s) / Patient State or Enable / Disable Test Mode) |
| H | List of patient numbers |
| I | An added column shows patients' Health card number |
| J | Patient State (ex. New, Consent, Ready, Inactive) |
| K | Health Status (normal, low risk, high risk) |
| L | Kit State (ex. Requested, Assigned, Returned) |
| M | Menu (Edit, Test Mode, Patient Token, Anonymous ID, Patient Overview, Request Kit, Remove Patient) |
Adding a New Patient
Add a new patient by clicking on the + Add Patient button in the top right corner of the page.

Enter the patient's information in the Create New Patient window. Click Create New Patient at the bottom of the form.

Assigning Patient Type
As you are creating a new patient, or by editing a current patient, select the patient type from the dropdown menu in the Personal Info section of the Create New Patient window or in the Edit Patient Info window accessible through the 3-dot menu to the right of the patient's name.


Adding Patients to a Patient Group
If you are creating a new patient, or editing a current patient, you can add the patient to one or more Patient Groups in the Health Info section of the Create New Patient window or the Edit Patient Info window accessible through the 3-dot menu to the right of the patient's name.


Inviting a Patient outside the aTouchAway® App
After creating the patient through the Create New Patient window, return to the Patients page. Click on the 3-dot menu to the right of the patient's name and select Patient Token.
Share this Patient Token via email or other communication. Patients will enter this token on the login page to connect their account to the patient profile that has already been created in the system.

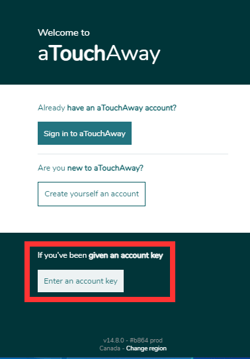
The new patient will go to the aTouchAway® App and click the Enter an account key button. The patient will then enter the Patient Token and complete account setup.
Requesting a Kit for aTouchAway / Simplified Patient Type
For those patients who have been given Patient Type: aTouchAway / Simplified, a kit that includes a tablet and biometric devices will need to be requested. To request a kit, click on the 3 dot menu to the right of the patient's name. Click on Request Kit.

Choose the appropriate kit from the list. Complete filling out the form on the Request Kit window. Add any additional notes as needed to the bottom of the form. Click Submit. You will be able to check the state of the requested kit on the Patients page under Kit Status.
5.2 Managers
The Managers page provides the ability to add and modify/remove managers that have been assigned to a patient. As well, permissions can be edited to allow them to manage the patient's profile information such as contacts, reminders, identification information, indicators, notes, and parameters of the equipment (aTouchAway® and bracelet) related to the patient.
You can filter the patient list to easily find a patient. Once at least one manager has been added to a patient, a filter will be available to easily find a manager in the list.
To add a manager, select your patient, then click the Add button at the bottom of the page. Continue adding more managers as necessary. When done, click on Add Chosen Managers.
Click the Edit button to set the permissions for each manager. Click on Submit when done.

To remove a manager from a patient, click the Delete icon.
If you have several managers that are managing many patients in a group, revisit section 4.7 Patient Groups in this guide to set up group permissions.
5.3 Patient Resources
Resources can be made available to patients for easy access to information, manuals, instructions, educational resources, and anything related to their care. To have resources available in your organization, the Aetonix® team will upload them into the system and will associate them with your organization.
Once your organization is ready, you can enable resource access from the Patient Resources page.
- Select the patient.
- Click on Add Access to Resources at the bottom of the page.
- Search for the resource you would like to add for this patient and click on its name to add it. Continue adding as many as necessary and click on Done when all desired resources have been added.

To remove a resource from the patient's list, click the Delete icon next to the resource name.
5.4 Patient Thresholds
Depending on your use case, thresholds may be useful to track your patient's health status. To set up thresholds, go to the Patient Thresholds page.
In this section, you can select a patient to assign them thresholds.
- Select a patient.
- Click Add a New Threshold at the bottom of the page. Select the threshold from the dropdown list and enter the values.
- Click on Submit.
- Add additional thresholds as needed by repeating Steps 2 and 3.
- Optional: Click on Mobile Alert Contacts at the top of the page to assign managers that will receive a notification when a patient meets the Low and High risk criteria as per the set thresholds.

At any time, you can switch to a different patient by clicking on Change Patient. This is helpful when you are setting individual thresholds for multiple patients.
To delete a threshold, click the Delete icon.
5.5 Urgency Contacts
This page allows you to set the contact(s) a patient using a Tablet Kit will call when pressing the Urgency call button on their home screen.
- Select the patient.
- Click on Add at the bottom of the page.
- The patient's managers will be automatically populated in the Available Respondents box. Select a manager to add as a respondent. Continue adding as many managers as desired.
If enabled, the Call in order option will direct the call to the managers in the order that they were added.

6. Live Monitoring
6.1 Availability
Displays patients by their status. Results can be filtered by All, Online and Offline.

6.2 Health Overview
You can view all your patient's pathway statuses as well as their vital signs readings under Health Overview. The box at the top of the list provides a quick summary of patients by High Risk, Low Risk and Normal status.
To filter the patient list, click on the View, Activity, or Patient Groups dropdown lists.
To search for a specific patient, type their patient number or health card number in the Search box.
To set up compliancy schedules, go to Compliancy Schedules; select the frequency and click on Done.
You can choose which columns to see in the table by clicking on Edit Table and selecting the values you wish to show in the table.

6.2.1 Exporting data of all patients (CSV)
To export the data of all patients, click on Export CSV and select the fields to export. You can anonymize the results for patients' privacy.
Name your export file, and click on Save to download the file:

6.2.2 Exporting single patient's data (CSV and PDF)
To export a single patient's data including the data entered in any group forms (depending on your use case), click on the patient's name, and you will be taken to the patient's record.
Click on Export CSV to download the individual's data in CSV format. Choose the date range, name the file, and click Save.

Click on Export PDF to download the data in PDF format. PDF format allows for group forms to be exported if they are available in your organization. Availability is dependent upon your use case.

If it is your first time using this function, click Next. At the end of the process, you will be given the opportunity to save the choices you make as a preset that can be accessed for future exports.
Select any health indicators to export or click Select All. Add a comment if desired.
Enter a date range and name your file.
Optional: Select any additional customizations such as the patient's file number.
Select which group forms to export. Click on Select All if desired.
Select pathways to export. Click on Select All if desired.
Optional: Save Settings as Preset will let you export the customized export for any other patient.
Click on Save to download the file.
6.3 Urgency Calls
This page allows a real-time view of urgency calls when they occur. You will find the name of the caller, the name of the person called, the state of the call, the date and time at which the call began, and the duration of the call.
The state of the call has four possible forms:
Accepted: audio/video communication was established between the devices
Cancelled: audio/video communication was not established
Denied: audio/video communication was not established because the call was refused
Calling: audio/video communication is ongoing
6.4 Reminders
This page allows a real-time view of the status of reminder messages. You will find the date and time of the reminder, the pending time, the name of the patient to whom it is destined, the status of the reminder, as well as its content.
6.5 Calls
This page allows to view the most recent calls in real-time. You will find the name of the person who initiated the call, the name of the person called, the state of the call, the start date and time, and the duration of the call. You can filter the results by caller, receiver or start date.
7. History
7.1 Group Calls
Group Calls shows the history of all the calls made by patients and managers in your group. You will find the name of the caller, the name of the person called, the state of the call, the date and time at which the call began, and the duration of the call. You can filter the results by the caller, the person being called or the day the call started.
To export the data in a CSV file, click on Report. Select a range of dates for the export, name the file and click on Save to download it.
7.2 Reminders
Reminders allows you to see and export the history of patients' reminders. You will find the date and time of reminders being shown and responded to, the name of the patient to whom it is destined, the content of the reminder as well as the state and response type. Results can be filtered by different criteria shown in the filter section.
To export the data in a CSV file, click on Report. Select a range of dates for the export, name the file and click on Save to download it.
7.3 Urgency Calls
This page allows you to see the history of urgency calls from patients. You will find the state of call, the recipient of the call, the date and time of the call, the duration, and the origin of the call. The data can be filtered by Status, Name, Date and Who initiated the call.

To export the data in a CSV file, click on Report. Select a range of dates for the export, name the file and click on Save to download it.
7.4 Forms Submissions
Depending on your use case, if forms are being used in your group, Forms Submissions allows you to view the history of a particular form that has been used. You will be prompted to choose a form upon opening.
Choose a form and you will find the name of the form, the patient name, the name of the person who edited this form (patient or manager), the time the submission was recorded and a View button that will display the data submitted in the form.
The results can be filtered by Patient, Editor and Date range.
The form data can be downloaded by clicking on the View button, then clicking on Download.

To switch to a different form, click the Reset button.
8. Health
The Health section will provide a history of the vital signs your patients have submitted. The different pages in this section will show you the history of:
- Blood Sugar
- Weight
- Blood Pressure & Heart Rate
- Pulse Oximetry & Heart Rate
- Body Temperature
Clicking on any of the pages under this section will allow you to see the name of the patient, the measurement values, and the time and date they were recorded. Results can be filtered by Patient and Date.
To export the data in a CSV file, click on Report. Select a range of dates for the export, name the file and click on Save to download it.